压力提前
本文档提供了关于调整特定喷嘴和耗材“压力提前”配置变量的方法。压力提前功能可以减少漏料。关于如何实现压力提前的更多信息,见运动学文件。
调整压力提前
压力提前有两个作用 - 它可以减少非挤出移动过程中的溢料和减少转弯时的凸起。本指南使用第二个功能(减少转弯过程中的凸起)作为优化机制。
为了校准压力提前,打印机必须已经配置完成并可以正常工作。因为调优测试涉及打印和检查测试对象。在运行测试之前,最好完整阅读本文档。
Use a slicer to generate g-code for the large hollow square found in docs/prints/square_tower.stl. Use a high speed (eg, 100mm/s), zero infill, and a coarse layer height (the layer height should be around 75% of the nozzle diameter). Make sure any "dynamic acceleration control" is disabled in the slicer.
Prepare for the test by issuing the following G-Code command:
SET_VELOCITY_LIMIT SQUARE_CORNER_VELOCITY=1 ACCEL=500
This command makes the nozzle travel slower through corners to emphasize the effects of extruder pressure. Then for printers with a direct drive extruder run the command:
TUNING_TOWER COMMAND=SET_PRESSURE_ADVANCE PARAMETER=ADVANCE START=0 FACTOR=.005
For long bowden extruders use:
TUNING_TOWER COMMAND=SET_PRESSURE_ADVANCE PARAMETER=ADVANCE START=0 FACTOR=.020
Then print the object. When fully printed the test print looks like:

The above TUNING_TOWER command instructs Klipper to alter the pressure_advance setting on each layer of the print. Higher layers in the print will have a larger pressure advance value set. Layers below the ideal pressure_advance setting will have blobbing at the corners, and layers above the ideal setting can lead to rounded corners and poor extrusion leading up to the corner.
One can cancel the print early if one observes that the corners are no longer printing well (and thus one can avoid printing layers that are known to be above the ideal pressure_advance value).
Inspect the print and then use a digital calipers to find the height that has the best quality corners. When in doubt, prefer a lower height.
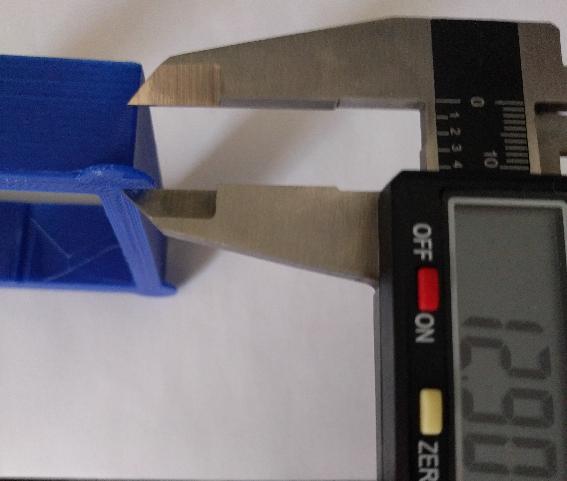
The pressure_advance value can then be calculated as pressure_advance = <start> + <measured_height> * <factor>. (For example, 0 + 12.90 * .020 would be .258.)
It is possible to choose custom settings for START and FACTOR if that helps identify the best pressure advance setting. When doing this, be sure to issue the TUNING_TOWER command at the start of each test print.
Typical pressure advance values are between 0.050 and 1.000 (the high end usually only with bowden extruders). If there is no significant improvement with a pressure advance up to 1.000, then pressure advance is unlikely to improve the quality of prints. Return to a default configuration with pressure advance disabled.
Although this tuning exercise directly improves the quality of corners, it's worth remembering that a good pressure advance configuration also reduces ooze throughout the print.
At the completion of this test, set pressure_advance = <calculated_value> in the [extruder] section of the configuration file and issue a RESTART command. The RESTART command will clear the test state and return the acceleration and cornering speeds to their normal values.
Important Notes
- The pressure advance value is dependent on the extruder, the nozzle, and the filament. It is common for filament from different manufactures or with different pigments to require significantly different pressure advance values. Therefore, one should calibrate pressure advance on each printer and with each spool of filament.
- Printing temperature and extrusion rates can impact pressure advance. Be sure to tune the extruder rotation_distance and nozzle temperature prior to tuning pressure advance.
- The test print is designed to run with a high extruder flow rate, but otherwise "normal" slicer settings. A high flow rate is obtained by using a high printing speed (eg, 100mm/s) and a coarse layer height (typically around 75% of the nozzle diameter). Other slicer settings should be similar to their defaults (eg, perimeters of 2 or 3 lines, normal retraction amount). It can be useful to set the external perimeter speed to be the same speed as the rest of the print, but it is not a requirement.
- It is common for the test print to show different behavior on each corner. Often the slicer will arrange to change layers at one corner which can result in that corner being significantly different from the remaining three corners. If this occurs, then ignore that corner and tune pressure advance using the other three corners. It is also common for the remaining corners to vary slightly. (This can occur due to small differences in how the printer's frame reacts to cornering in certain directions.) Try to choose a value that works well for all the remaining corners. If in doubt, prefer a lower pressure advance value.
- If a high pressure advance value (eg, over 0.200) is used then one may find that the extruder skips when returning to the printer's normal acceleration. The pressure advance system accounts for pressure by pushing in extra filament during acceleration and retracting that filament during deceleration. With a high acceleration and high pressure advance the extruder may not have enough torque to push the required filament. If this occurs, either use a lower acceleration value or disable pressure advance.
- Once pressure advance is tuned in Klipper, it may still be useful to configure a small retract value in the slicer (eg, 0.75mm) and to utilize the slicer's "wipe on retract option" if available. These slicer settings may help counteract ooze caused by filament cohesion (filament pulled out of the nozzle due to the stickiness of the plastic). It is recommended to disable the slicer's "z-lift on retract" option.
- The pressure advance system does not change the timing or path of the toolhead. A print with pressure advance enabled will take the same amount of time as a print without pressure advance. Pressure advance also does not change the total amount of filament extruded during a print. Pressure advance results in extra extruder movement during move acceleration and deceleration. A very high pressure advance setting will result in a very large amount of extruder movement during acceleration and deceleration, and no configuration setting places a limit on the amount of that movement.